ALERT CONTENT PLACEHOLDER

​SharePoint Online is a collection of online tools that makes it easy to store, share and manage your team'​s documents. Your SharePoint Online Team Site connects you and your team to content, information and apps you rely on for day-to-day work.

Access your SharePoint Online sites here

​For updated news, tip sheets and guides, visit the SharePoint Online Help Centre.


For Users

Upon accessing your SharePoint Online Site for the first time, you will see the below items from your homepage. Starting exploring to find out what your team needs to create the ideal collaborative online environment.

Overview SharePoint Online

Uploading Documents in a Document Library

A document library is where you can upload documents for other members of your team to view or edit.

Step 1 Browse to the library in which you want to upload the document

Step 2 Click on Files under the Library Tools submenu

Step 3 Click on the Upload Document icon on the menu bar to select desired Document

OR

Step 1 Drag and drop documents from your desktop to your SharePoint Online document library

Step 1 From the desired document library, select the document you want to share and then click the Share button.

Step 2 Click the dropdown in the Share dialogue box. You will see two available options:

  1. People with existing access: This allows you to send a link to the document to everyone who already have access to the file or site.  An optional message can be added to these recipients. You may also click Copy Link so that you can send a web link to these colleagues through your own drafted Outlook email
  2. Specific people: This allows you to share with people who do not yet have access to your site. To do this, please contact your site owner.
sharing documents  

Step 1 Open a team document from your document library using Office Online. This can be done by right-clicking the document, clicking Open With, and then selecting the Online version of the application, such as Word Online, Excel Online, etc.

Step 2 When another person accesses the document at the same time through Office Online products, you will receive an alert.

Step 3 Edit your document with your colleague. You will also see coloured flags indicating the section they're working on.

Step 1 Right-click on the Document

Step 2 Select Version History from the drop-down menu.

Step 3 You'll see a list of versions of the document. Next to the date and time, you'll see a dropdown arrow. Select the arrow for a list of options. 

Step 4 Click View for more details. You can also select Restore if that is the version you would like to restore and work on.

Step 5 If you click View, a Version history box will appear with various actions you can select.

Note: For all document versions except the current version, you'll see View, Restore, and Delete. For the current version, you can only view or restore the file.


select version history
view version history
version history dialog box 

For Site Owners

For full details on the features available to you, please review the following SharePoint Online Site Owner Manuals:

 Getting Started

 Advanced Features

As a site owner, your responsibilities include:

  • Managing user permissions: You can control who can contribute and who can read only on your site.  
  • Managing content: You will help to create, edit, and delete content (or the site itself please be careful!)
  • Modifying the layout of pages: This includes general design of your homepage and ensuring it is intuitive for your team.
  • Adding sub-sites, web parts and objects: You can create lists, calendars, task trackers, and more
  • General training and onboarding: You will need to help your team members feel comfortable with the site, directing them to our Information Site, the SharePoint Help Centre, and providing ongoing support as needed.

Step 1 From your SharePoint Online site, click on the Settings icon and then select Add an app from the drop-down menu.

Step 2 Select Document Library on the page

Step 3 Name your Library and click Create.

Document library
Adding Document library  

In addition to document libraries, SharePoint Online allows you to customize your site by adding other apps like task or issue trackers and calendars.

On the site where you want to add an app, click on the Settings icon located on the top right-hand corner of the page.

From the drop-down menu, click Add an app.

Add Apps

By default, your team will not be able to share team documents from SharePoint Online to other UHN colleagues. To change this default setting:

Step 1 From your SharePoint Online site home page, click on the Settings icon and select Site settings and then under Users and Permissions heading, select Site Permissions.

Step 2 Along the top ribbon, ensure you select the Permissions tab, and click Access Request Settings.

Step 3 Ensure Allow members to site and individual documents and folders is checked then click Ok.

allow sharing documents  

By default, your team will not be able to share team documents from SharePoint Online to other UHN colleagues. To change this default setting:

Step 1 From your SharePoint Online site home page, click on the Settings icon and select Site settings and then Site Permissions

Step 2 Along the top ribbon, ensure you select the Permissions tab, and click Access Request Settings.

Step 3 Ensure Ensure Allow access requests is checked.

Step 4 Enter an email address under Send all requests for access to this following email address. Then click Ok.

Managing Access Permission  

Site owners have ability to manage user permissions on their site. There are three default permissions levels:


User Permissions

Viewing Members of a SharePoint Online Group

Step 1 Click on the Settings icon and then select Site settings.

Step 2 Select People and Groups under the Users and Permissions heading.

Step 3 Click on the group name from the left-hand side menu to display all members of that particular group.

View Members  

Adding a user to a SharePoint Online group

Step 1 From the People and Groups page, select the New button to add new users.

Step 2 Type in the user's name and click Share. An email will automatically be sent to the user(s) notifying that they now have access.

Removing a user from a SharePoint Online group

Step 1 From the People and Groups page, select the user you want to remove by checking the box next to their name.

Step 2 Select Actions and then click Remove Users from Group.

Step 3 A dialogue box will appear to confirm the action. Click Ok.

Remove Members  

As a site owner you determine the organization and presentation of Web pages, documents, lists and data within your site. Some easy ways to organize the layout of the homepage include updating the Top Link Bar or Quick Launch menu.

Top Link Bar

The top link bar control displays links along the top of every SharePoint Online page. This is helpful for organizing key top-level folders or other external sites, which your team members may need to reference.

Step 1 Click Edit Links. Customize Layouts Navigation

Step 2 This allows you to add, reorder, rename and delete links from the navigation Manage Navigation
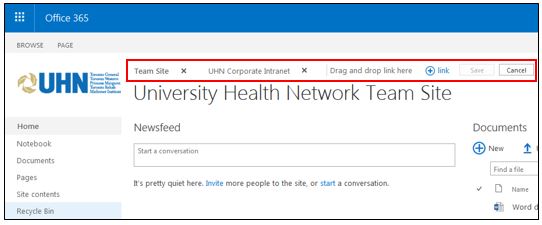
Step 3  Similarly you can edit these links by navigating through Site Actions > Site Settings > Top link Bar.


Quick Launch

Quick Launch

Quick launch typically highlights the important content in the current site, such as lists and libraries. It is common for it to appear on the left of each page in a site.

If you want to add, remove, or rearrange the links, click Edit Link in the at the bottom of your Quick Launch. You can also add, remove, rearrange links or create new headings in Site Settings for the site.

In SharePoint, the left navigation panel is known as the Quick Launch. It can be customized using Settings > Site Settings > Quick Launch (under Look and Feel category).

Quicklinks
Back to Top