With O365, Outlook and Outlook on the web is much more than just email. It has least 50GB of storage space for your emails, helps with scheduling your day and integrates with Skype for Business. When you're out of the office, you can keep access your emails from any computer through the O365 Portal, and using your personal mobile device so you never miss a thing. Just remember to use your primary UHN email address when you log in and get started!
Please follow the below image and associated instructions for an overview of Outlook on the web through the O365 Portal.
Click on the numbers for more information.
Step 1 From your O365 Portal, select the
settings icon > Mail > Email Signature (found under the Layout section).
Step 2 A new window will appear. Type the signature you wish to use in your emails.
Step 3 If you want your signature to display at the bottom of all outgoing items, ensure you select both checkboxes in the Email signature window.
This adds your signature to new messages, email replies or forwards.
You can now upload a photo of yourself to the O365 Portal. This image will be visible from your email (Outlook and the O365 Portal) and from your Skype for Business application.
Step 1 Log into your O365 Portal at
https://portal.office.com.
Step 2 Select your name at the top right corner of the page.
Step 3 Click the grey profile icon and a new window will appear.
Step 4 In the new window, click Browse and select a photo from your computer.
Step 5 Select the photo you want as your O365 profile picture and then click
Save.

You can notify a UHN colleague or external contact when you are out of the office using the Automatic Out-of-Office Reply feature.
Step 1 From Outlook on the web, select the
settings icon > Automatic replies.
Step 2 A new window will appear. You may choose a start and end date for your automatic replies. Otherwise, your automatic replies remain on until you manually turn them off.
Step 3 In the box at the bottom of the window, type a message to send to people during the time you're away, and select
OK.
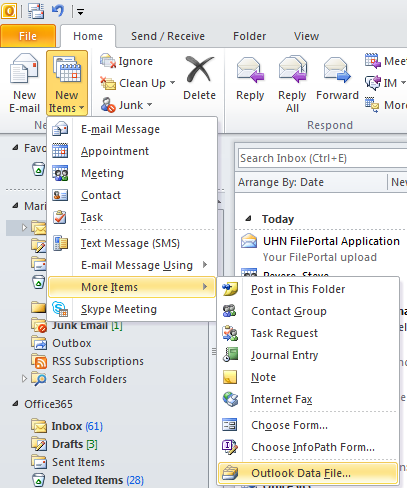
Step 1 In Outlook, choose: Home >
New Items >
More Items >
Outlook Data File.
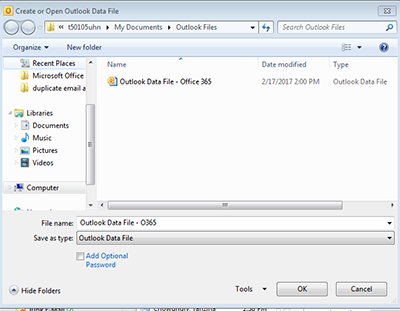
Step 2 Choose the file named archive (or the name you specified for the archived file) and click
OK.
Step 3 Expand the archive file in the Outlook Navigation pane to see the subfolders in it. Click each subfolder to see the contents.

You can manually back up and archive items, or choose to automatically archive older items in your inbox. To manually archive Outlook items:
Step 1 Click the
File tab and select
Cleanup Tools.
Step 2 Click Archive and an new window for your archive settings will open.
Step 3 Select the
Archive this folder and all subfolders option, and then choose the folder that you want to archive.
From this window, you can also choose to archive older email messages. In the Archive items older than field, enter a date.
With message recall, a message that you sent is retrieved from the mailboxes of the recipients who haven’t yet opened it. You can also substitute a replacement message. Please note, this feature is only available in the Outlook application, and not in O365 Portal.
Step 1 In the folder pane, select the Sent Items folder. and double-click the message you want to recall.
Step 2 Under the Message tab, choose Actions > Recall This Message
Step 3 A Recall This Message window will appear.
Click Delete unread copies of this message or Delete unread copies and replace with a new message, and then click OK.
Step 4 If you're sending a replacement message, compose the message, and then click Send.
When you delete an item from your Outlook mailbox, it will remain in your Deleted Items folder indefinitely.
If you delete an item from the Deleted Items folder, you can recover it from your Outlook desktop application within 30 days. After that 30 day time period, you can contact the Help Desk for further assistance and note, recovery may not be possible.
Step 1 From Outlook, go to your email folder list and click
Deleted Items.
Step 2 Ensure the
Home tab is selected at the top, left-hand corner, and click
Recover Deleted Items From Server.
Step 3 A new window will appear. Select the item you want to recover, click
Restore Selected Items and then click
Ok.
Step 4 The recovered email will return to your Deleted Items folder. You can choose to move it to your other folders as needed.

It is a good idea to periodically review your Junk Email folder to make sure you're not missing important messages.
If you find any messages incorrectly classified as junk mail, you can update your junk mail settings in the Outlook application and the O365 Portal. This allows you to build a Safe Senders list and any email or domain on that list can come to your inbox.
Managing your Junk Mail Settings from the Outlook application:
Step 1 Click on the Junk Email folder and select an email you wish to add to your Safe Senders List.
Step 2 Along the top menu bar, select
Junk. From here, you can choose to
Block or Never Block Sender (or you can also select
Never Block Sender's Domain). If you select a Never Block option, this will add the sender to your Safe Senders List.
Step 3 If you wish to view and manage your Safe Senders List manually, select
Junk from the top menu bar, and then select
Junk Email Options.
In the Safe Senders tab, you can manually add and remove email addresses.

Managing your Junk Mail Settings from the O365 Portal:
Step 1 Sign into your Webmail through the O365 Portal at
http://portal.office.com.
Step 2 Along the top of the page, select Settings indicated by the gear icon. Then select
Mail.
Step 3 Under Accounts, select
Block or allow.
Step 4 To add an email to Safe senders and recipients, enter the email address or domain you want to mark as safe in the text box 'Enter a sender or domain here'. Then press Enter or select the add icon.
Below the Safe Senders list, you can also update your list of Blocked Senders as needed.
Step 5 Select
Save to save your changes.
If you are an administrator of a UHN distribution list and need to edit the membership list, please follow the steps below:
Step 1 Select the gear icon along the top banner of your window to open your Settings menu, and then select
Mail.
Step 2 You will be redirected to a new window. From the left side of the page, select
General, then Distribution groups.
Step 3 Look for a section called
Distribution groups I own and select the name of the distribution list you wish to edit.
Step 4 Select
Edit and make the changes to your distribution list membership as needed
Step 5 Select
Save to save your changes or
Cancel to leave without saving.

